The Ultimate Guide to Automatic Accessibility Testing in CI/CD for React Apps
Last updated on April 2023
I've worked with many engineers who I consider to be extremely skilled at Frontend code, knew the web APIs inside-out... but produced very inaccessible web applications due to a lack of understanding that not everyone uses a mouse and keyboard like they do.
(who needs aria attributes? why test without a mouse? who needs to use <button> tags when you can put an onclick on a span 🙄...!)
Web accessibility is very important, quite easy to learn the basics - but it is so easy to forget to consider accessibility considerations.
I do not believe that automated accessibility checks can ever replace proper manual accessibility checks, but if we can automate some checks as part of our CI/CD flow, we can ensure that some of the easy-to-check issues can be avoided.
It's often a case of adding a HTML element attribute (like alt, or correctly setting up <label> elements).
What is CI/CD? continuous integration and continuous delivery or continuous deployment. The automatic checks that run when your code builds, before it deploys. These are often run as part of a pull request.
What is a11y? A11y means accessibility ('a', then 11 letters, then 'z'). Which some claim the word itself is not accessible....
Even with all the magic in the last year of AI, I still think that we are far away from being able to fully test for accessibility issues in an automated way.
But, there are lots of easy-to-find (and easy-to-fix) issues that are easy to miss during PR reviews that can be found via automated checks.
This is a list of tools you can use that can easily be integrated into your CI/CD workflow, to automatically run a11y checks.
Before we begin - a note on Axe
Lots of tools on this list use axe. It is the leading library for checking for accessibility violations.
It is released by deque. They are one of the leading accessibility companies. Their knowledge base is fantastic (you have to pay to get access - but it is worth it).
As well as the Axe library (used by many of the tools on this page), they also have an easy-to-use Chrome plugin for manual testing.
I wouldn't recommend using everything listed on this page, as they will be checking for similar violations if they use Axe.
But hopefully by listing a few options you can find something easy to add to your current CI stack and start running a11y checks with no fuss.
Use React Testing Library
The most popular testing library for React is RTL (React Testing Library). It is for regular testing - not specifically for testing accessibility.
However, it is designed in a way that heavily encourages the use of semantically correct markup, which can be a huge first step into making an application more accessible.
For example, to get the input element in this form (so you could trigger something like a click)
<form>
    <label>
        Your name
        <input name="first_name" />
    </label>
</form>
You could target it by something like container.querySelector('input[name="first_name"]').
But that is getting the input by knowing some implementation details that a user on your app wouldn't know.
A user sees 'Your name', and an input, and your tests should reflect that.
With RTL it will encourage you to get an input based on its label - which is much more similar to how a human works.
So with RTL, it will encourage you to use something like getByLabelText:
const input = getByLabelText('Your name');
Why is this good for accessibility testing? Well, it forces you to think about your markup. If you write your production code in a way that works well for the queries like getByLabelText(), getByRole(), etc then it is much more likely to be accessible.
Another example is if you were implementing a custom checkbox.
You might have rendered markup like this:
<div class="custom-checkbox">
    <div class="custom-checkbox__checkbox-indicator-on"></div>
    <div class="custom-checkbox__toggler">Toggle</div>
</div>
<span>Turn on notifications</span>
The actual JS implementation isn't important here. Just pretend that it renders in a nice toggle/checkbox, looks nice, and works well.
With RTL you would struggle to test that in a nice way! You might resort to checking CSS classes, which is not nice
And screen readers would also struggle to understand that it is a checkbox.
If you coded your checkbox so it rendered something like this:
<div class="custom-checkbox" role="checkbox" aria-checked="true" aria-labelledby="checkbox-toggle" tabindex="0">
    <div class="custom-checkbox__checkbox-indicator"></div>
    <div class="custom-checkbox__toggler" id="checkbox-toggle">Toggle</div>
</div>
<span id="checkbox-label">Turn on notifications</span>
Then you can do things in RTL such as:
const checkbox = getByLabelText('Turn on notifications');
expect(checkbox).toBeChecked();
So while RTL isn't aimed to do a11y testing, by making sure your team uses it in the correct way you are also ensuring you have semantically correct markup which can help a lot with making your applications accessible.
Using Axe with Jest
If you install jest-axe, you can use Axe in your jest tests.
See more about jest-axe here
This is an example of using jest + jest-axe:
test('custom checkbox passes axe accessibility tests', async () => {
  const {container} = render(<YourCustomCheckbox />)

  expect(await axe(container)).toHaveNoViolations()
})
If you use it with RTL there is some minor config to set up (its all in their readme).
It can catch things such as:
- images not having alt text
- requires valid
roleattributes - checks you don't use inaccessible elements such as
<blink> <iframe>must have a title assigned to it- every form element must have a label
<video>has captions
and much more!
Storybook
If you are doing FE work then you must be aware of Storybook. It's really caught on in the last few years. I know when it first appeared it was a lot of hassle to set up (and migrate between versions) but I think now its pretty stable and useful - especially for larger teams or if you share components between projects/applications.
But I am mentioning it here because of their storybook a11y plugin.
Setup is simple: add @storybook/addon-a11y as a dependency, then update main.js and add '@storybook/addon-a11y' as an addon.
Then it will run some a11y tests and report back to you. You can also toggle a button to highlight the exact element(s) which have a11y violations.
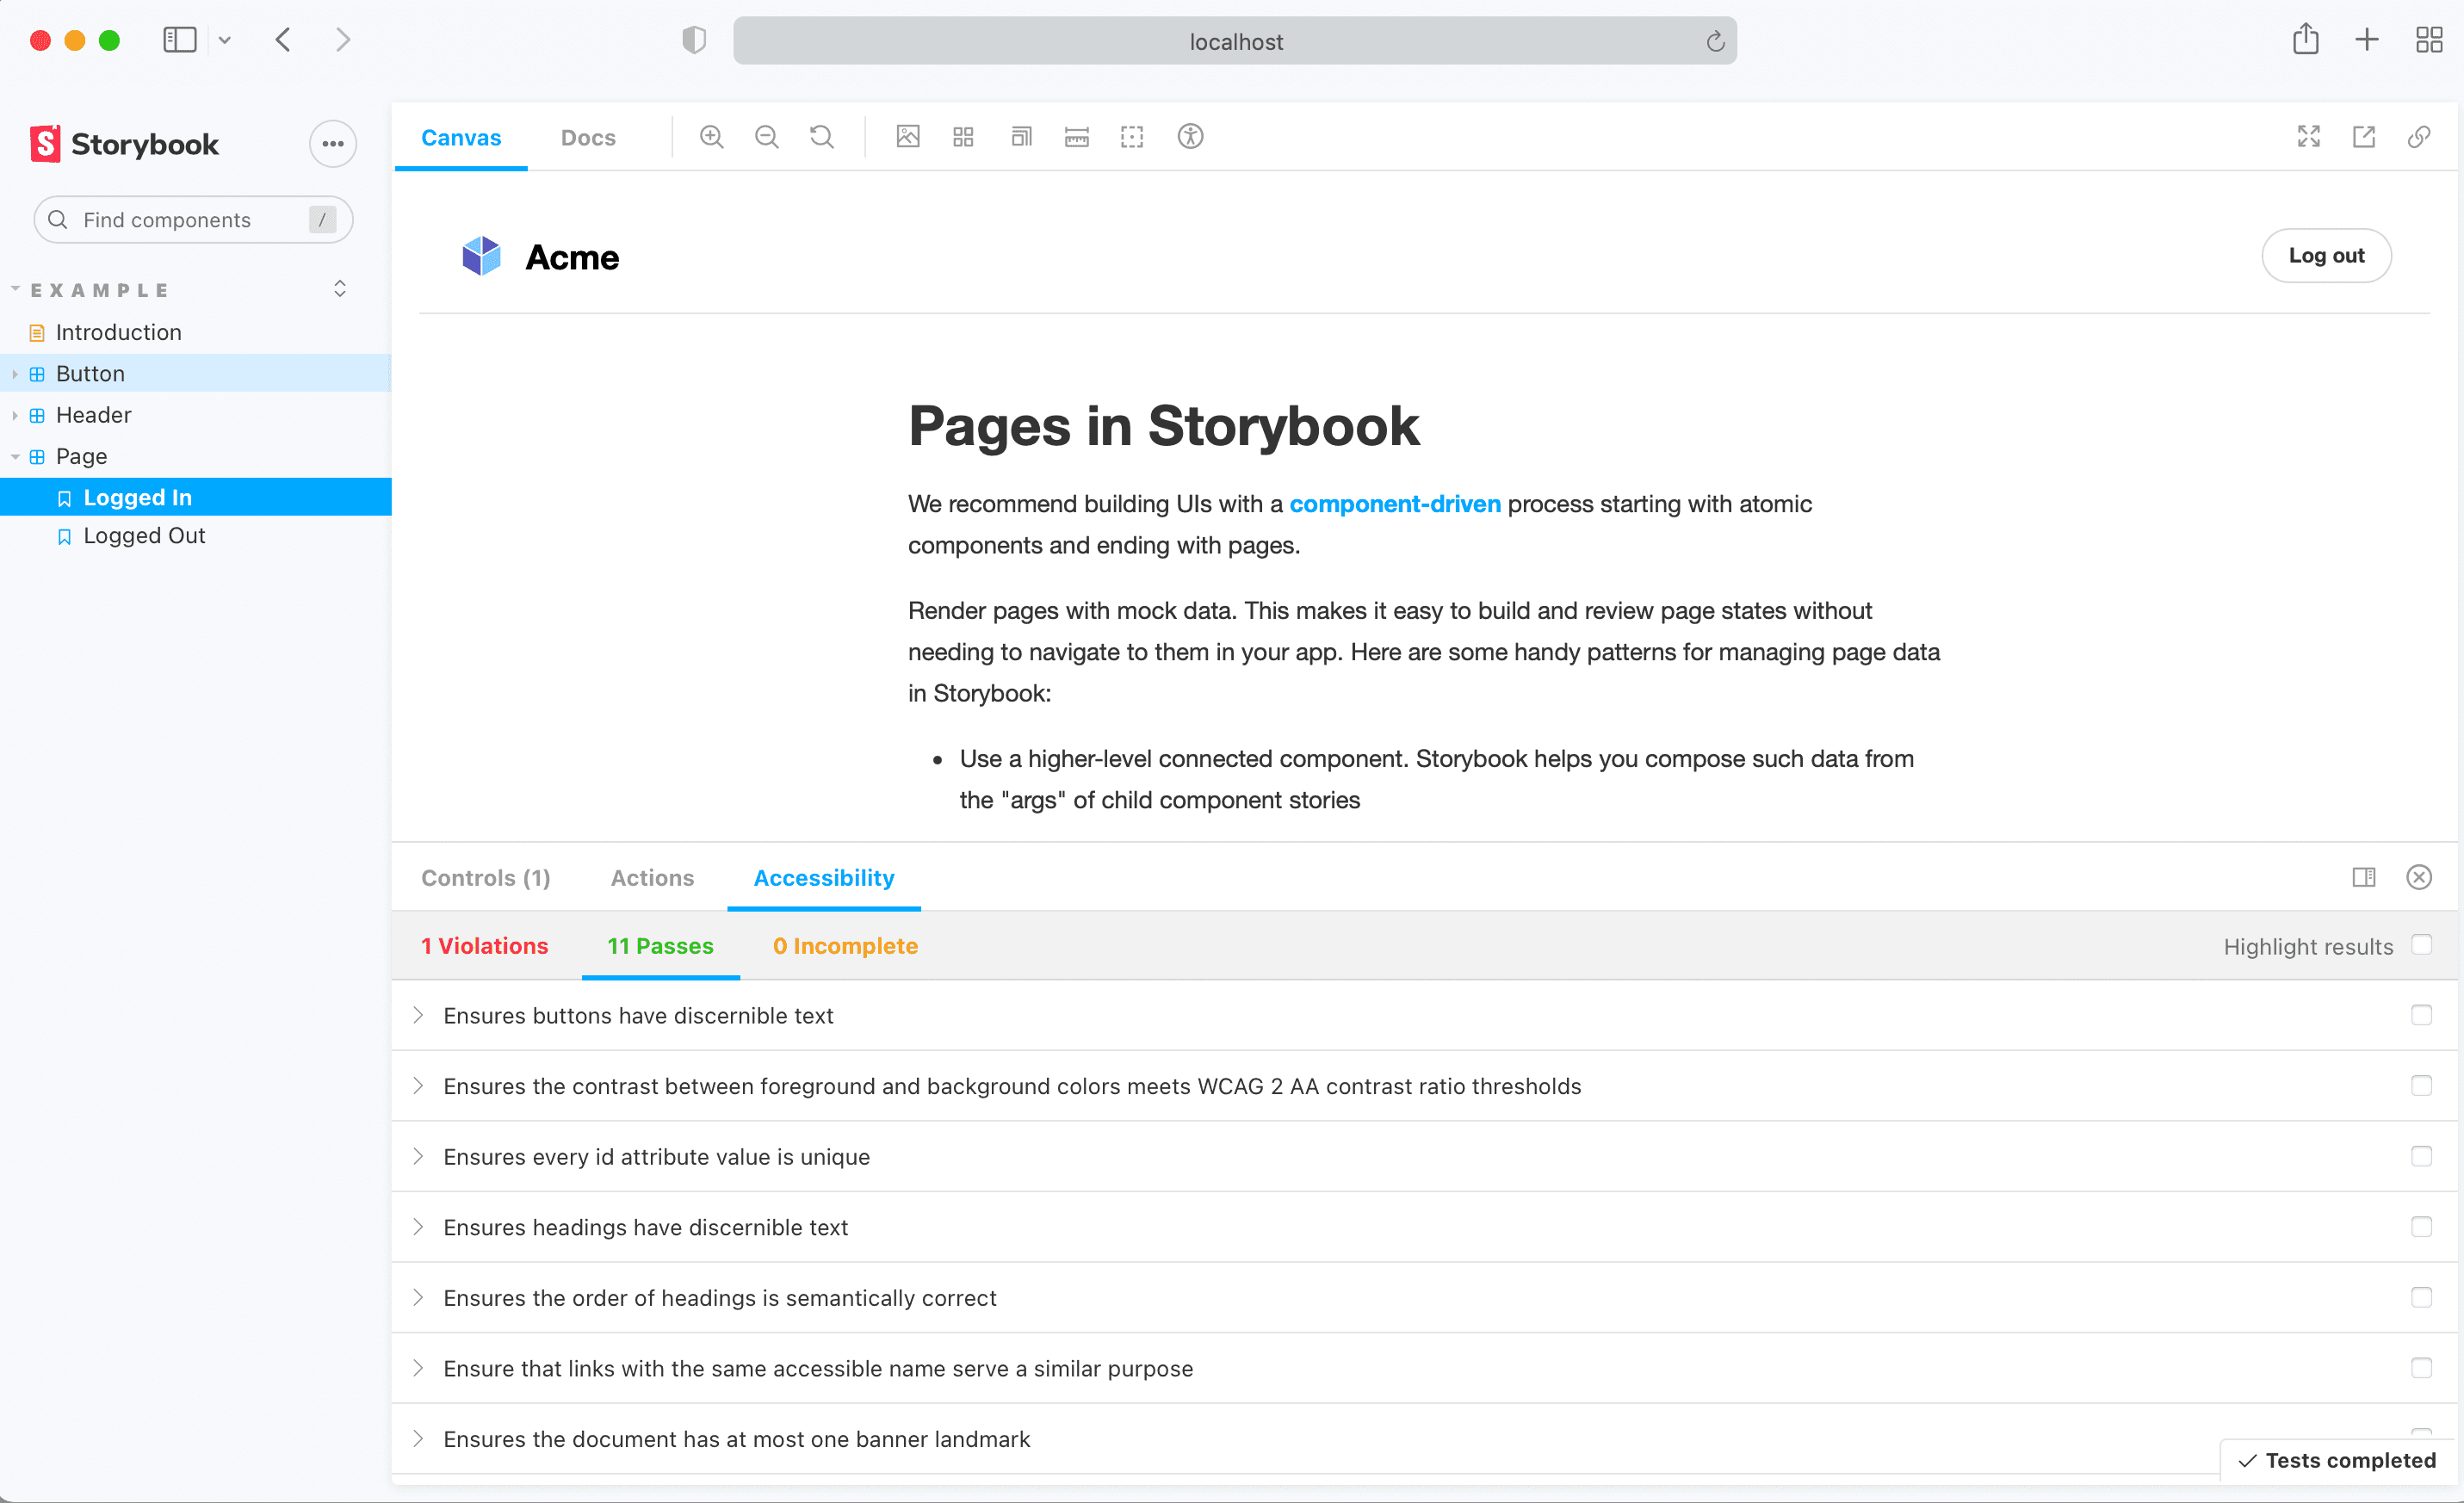
There is some overlap between axe-jest and this (it uses the same core library), but I prefer this one as it is much easier to visualize where the issues are. It also has pretty good colour contrast violation checks.
Of course, Storybook is normally something you interact with (manually). But you can setup axe-playwright to automatically run these tests as part of your CI/CD. See instructions here
Use eslint to check for a11y issues in your React JSX
I strongly recommend installing and setting up the eslint-plugin-jsx-a11y plugin.
It will check and report issues on things such as:
- requires emojis to be wrapped in a
<span>and made accessible to screen readers (e.g.🐼should be something like<span role="img" aria-label="Panda">🐼</span>) - checks that aria properties are valid
- checks for image alt text, and that they are not words such as "image" (which does not help assistive technology users)
- checks that mouse events (
onClick) also have keyboard event handlers (not everyone uses a mouse!) - and much more!
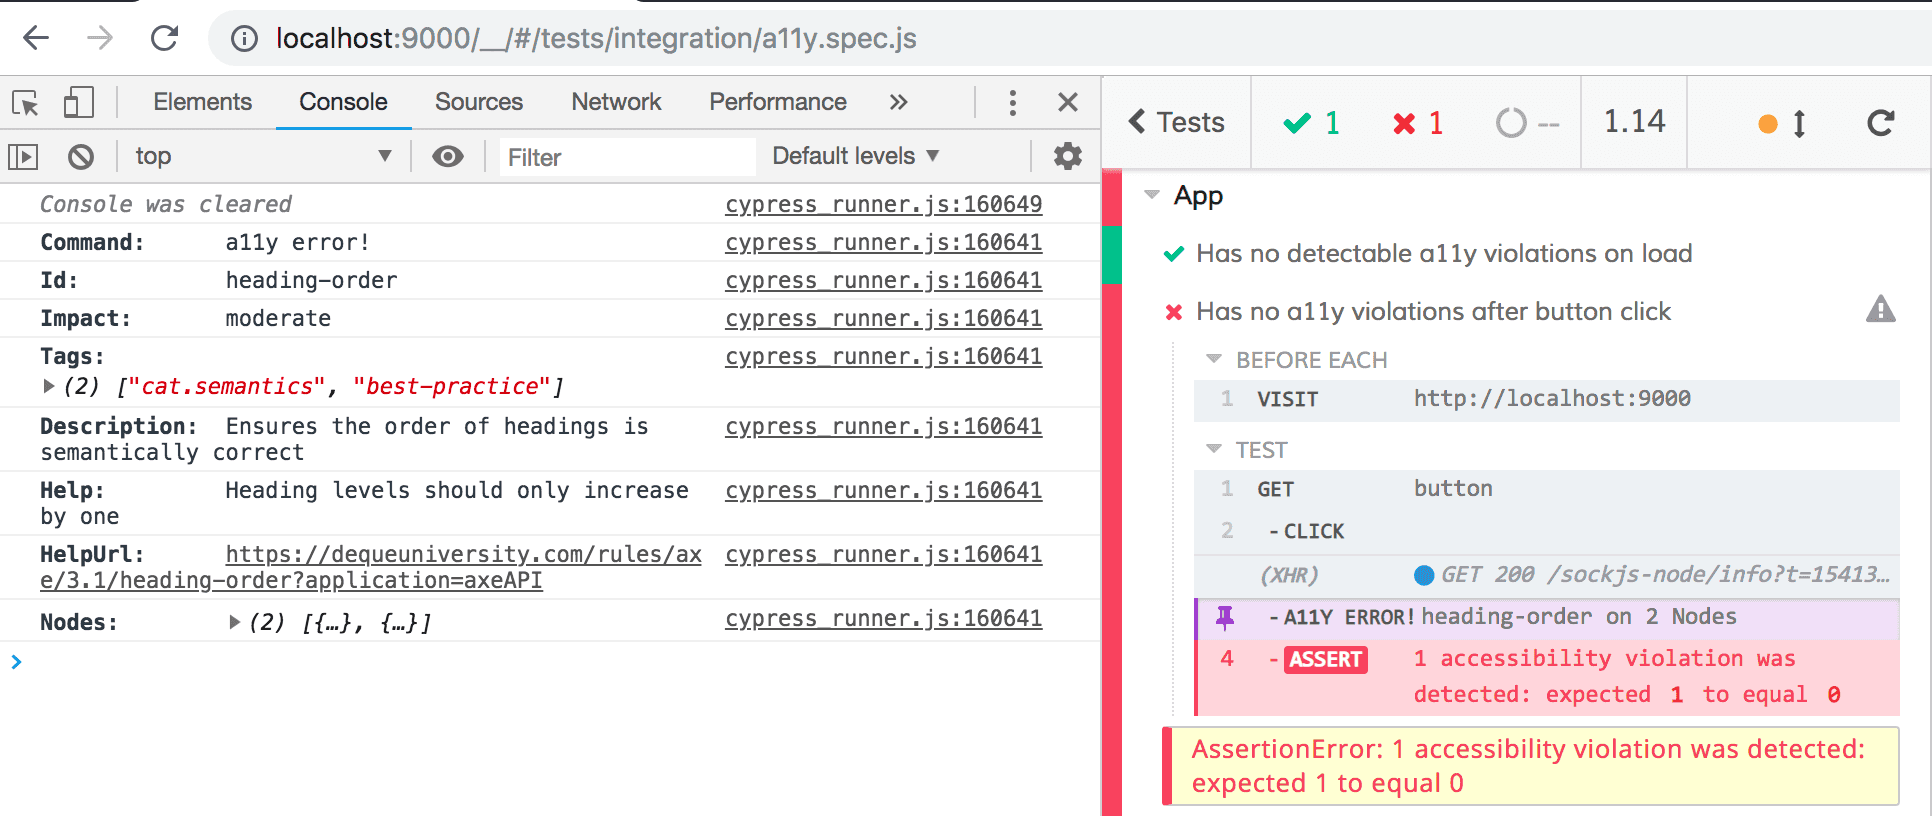
Accessibility testing with Cypress
Cypress is a standard part of e2e testing now (although it looks like Playwright is becoming very popular too now).
And like many of the previous tools, you can use axe with it.
See the package on nom: cypress-axe
Is easy to set up. Install it, then run cy.injectAxe() on pages that you want to run a11y tests. Then you can run cy.checkA11y(), and you can target specific elements to check.
Accessibility testing with Playwright
If you are not familiar with Playwright, it is very similar to Cypress (but claims to be less flaky!). I've used it, I like it, but personally feel that Cypress is just the industry standard which everyone knows.
You can use the @axe-core/playwright plugin (also used by the storybook a11y checks) to run accessibility checks in Playwright.
Example code:
import { test, expect } from '@playwright/test';
import AxeBuilder from '@axe-core/playwright';

test.describe('homepage', () => {
  test(
    'should not have any automatically detectable accessibility issues',
      async ({ page }) => {
      await page.goto('https://your-site.com/');

      const accessibilityScanResults =
          await new AxeBuilder({ page }).analyze();

      expect(
          accessibilityScanResults.violations
      ).toEqual([]);
  });
});
They also have a nice API to use snapshots to allow specific known issues to be skipped. I'm not a fan of snapshots in general and skipping known violations (instead of fixing them) isn't ideal. But sometimes if you are inheriting a large inaccessible app it can help move things forward.
Check out their docs for more info
AccessLint (for Github)
this isn't React specific - but I wanted to give them a mention as maybe you have HTML files you want to run very basic tests on
This is a Github App, so if you are not using Github for your app you are out of luck.
But it is a very easy tool to integrate and provides nice comments that any engineer or developer can understand.
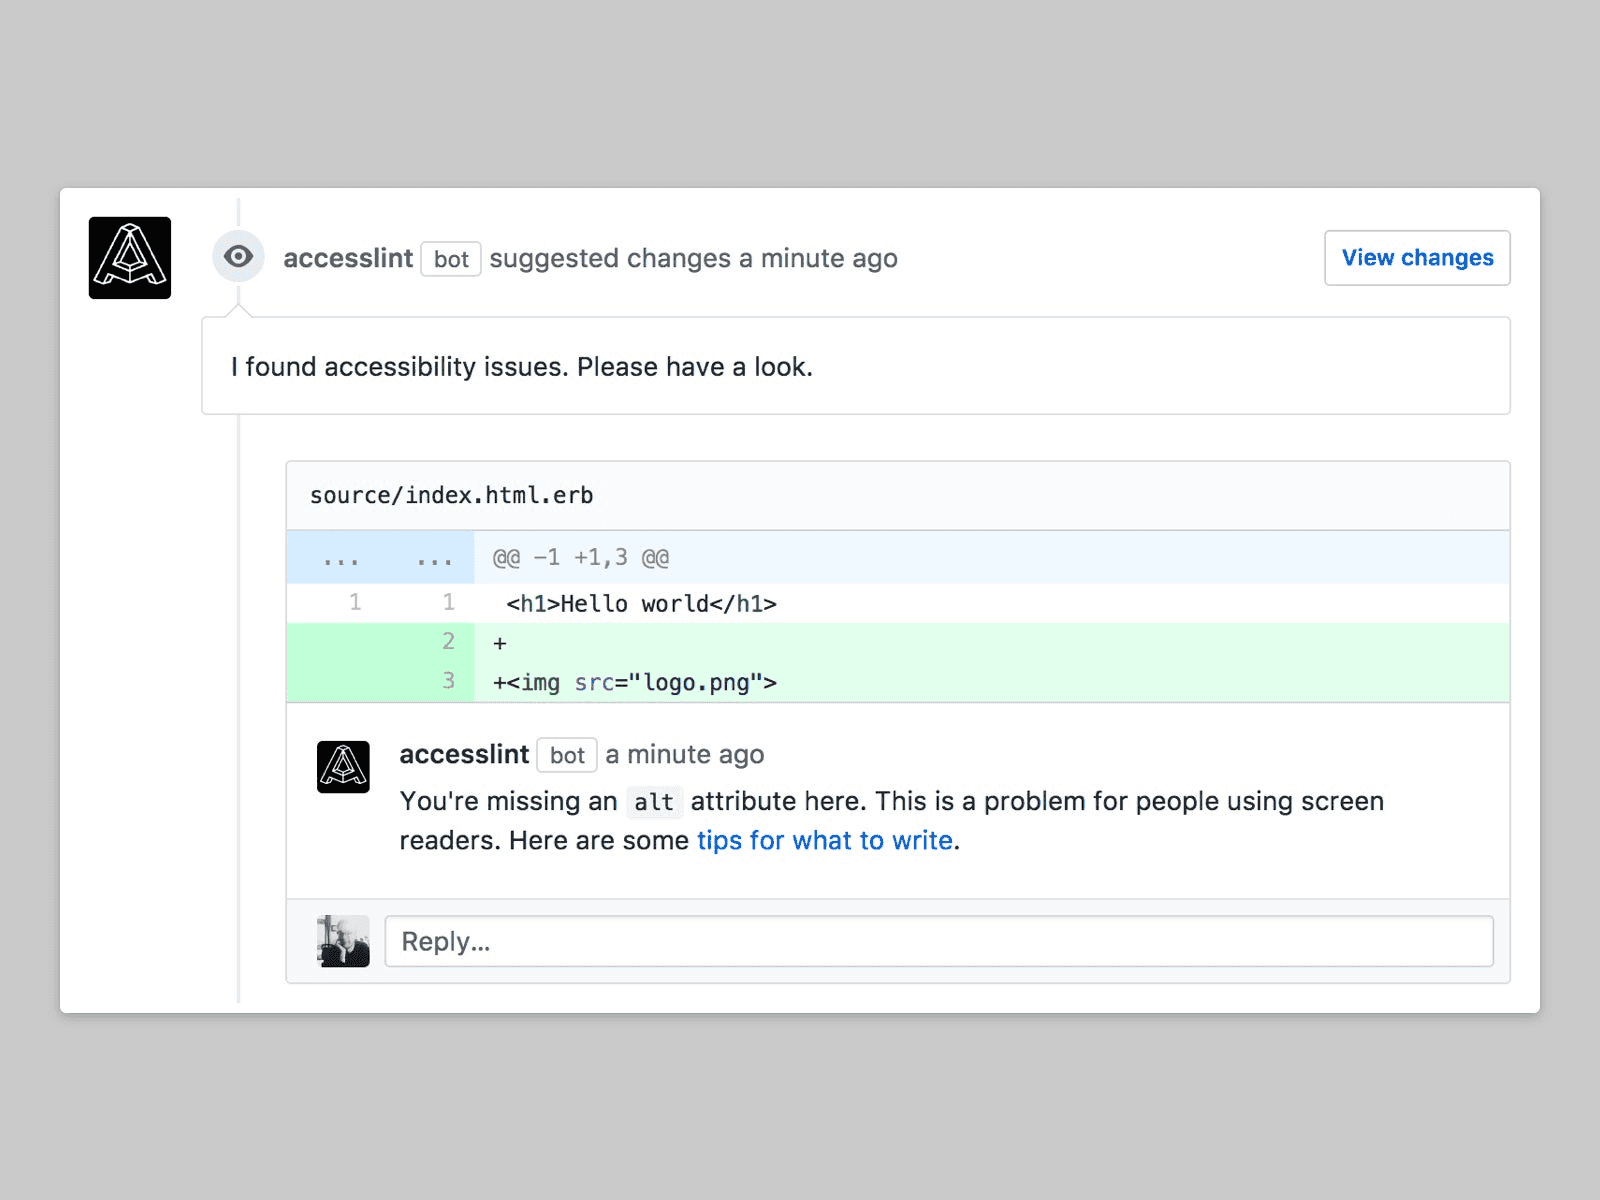
I think this approach is great if the team is quite new to thinking about accessibility, as it is very approachable and provides easy fixes to the issues it finds.
It isn't as comprehensive as other checks and only finds basic issues (such as form elements without labels, inaccessible tabindex values, missing alt texts or invalid aria attributes). But they're still good to have these checks.
Use Pa11y CI
Pa11y is an open-source library that aims to automate a lot of a11y testing. It works well with CI workflows too (see here)
I have used it only briefly, and it seems much more set up for testing a live website (as opposed to testing individual components which is what most on my list are aimed at).
You pass in some config such as
{
    "urls": [
        "https://pa11y.org/",
        "https://pa11y.org/contributing"
    ]
}
Or you can pass in a list of urls from a sitemap (pa11y-ci --sitemap http://example.com/sitemap.xml). Like some previous tools on this list it uses axe.
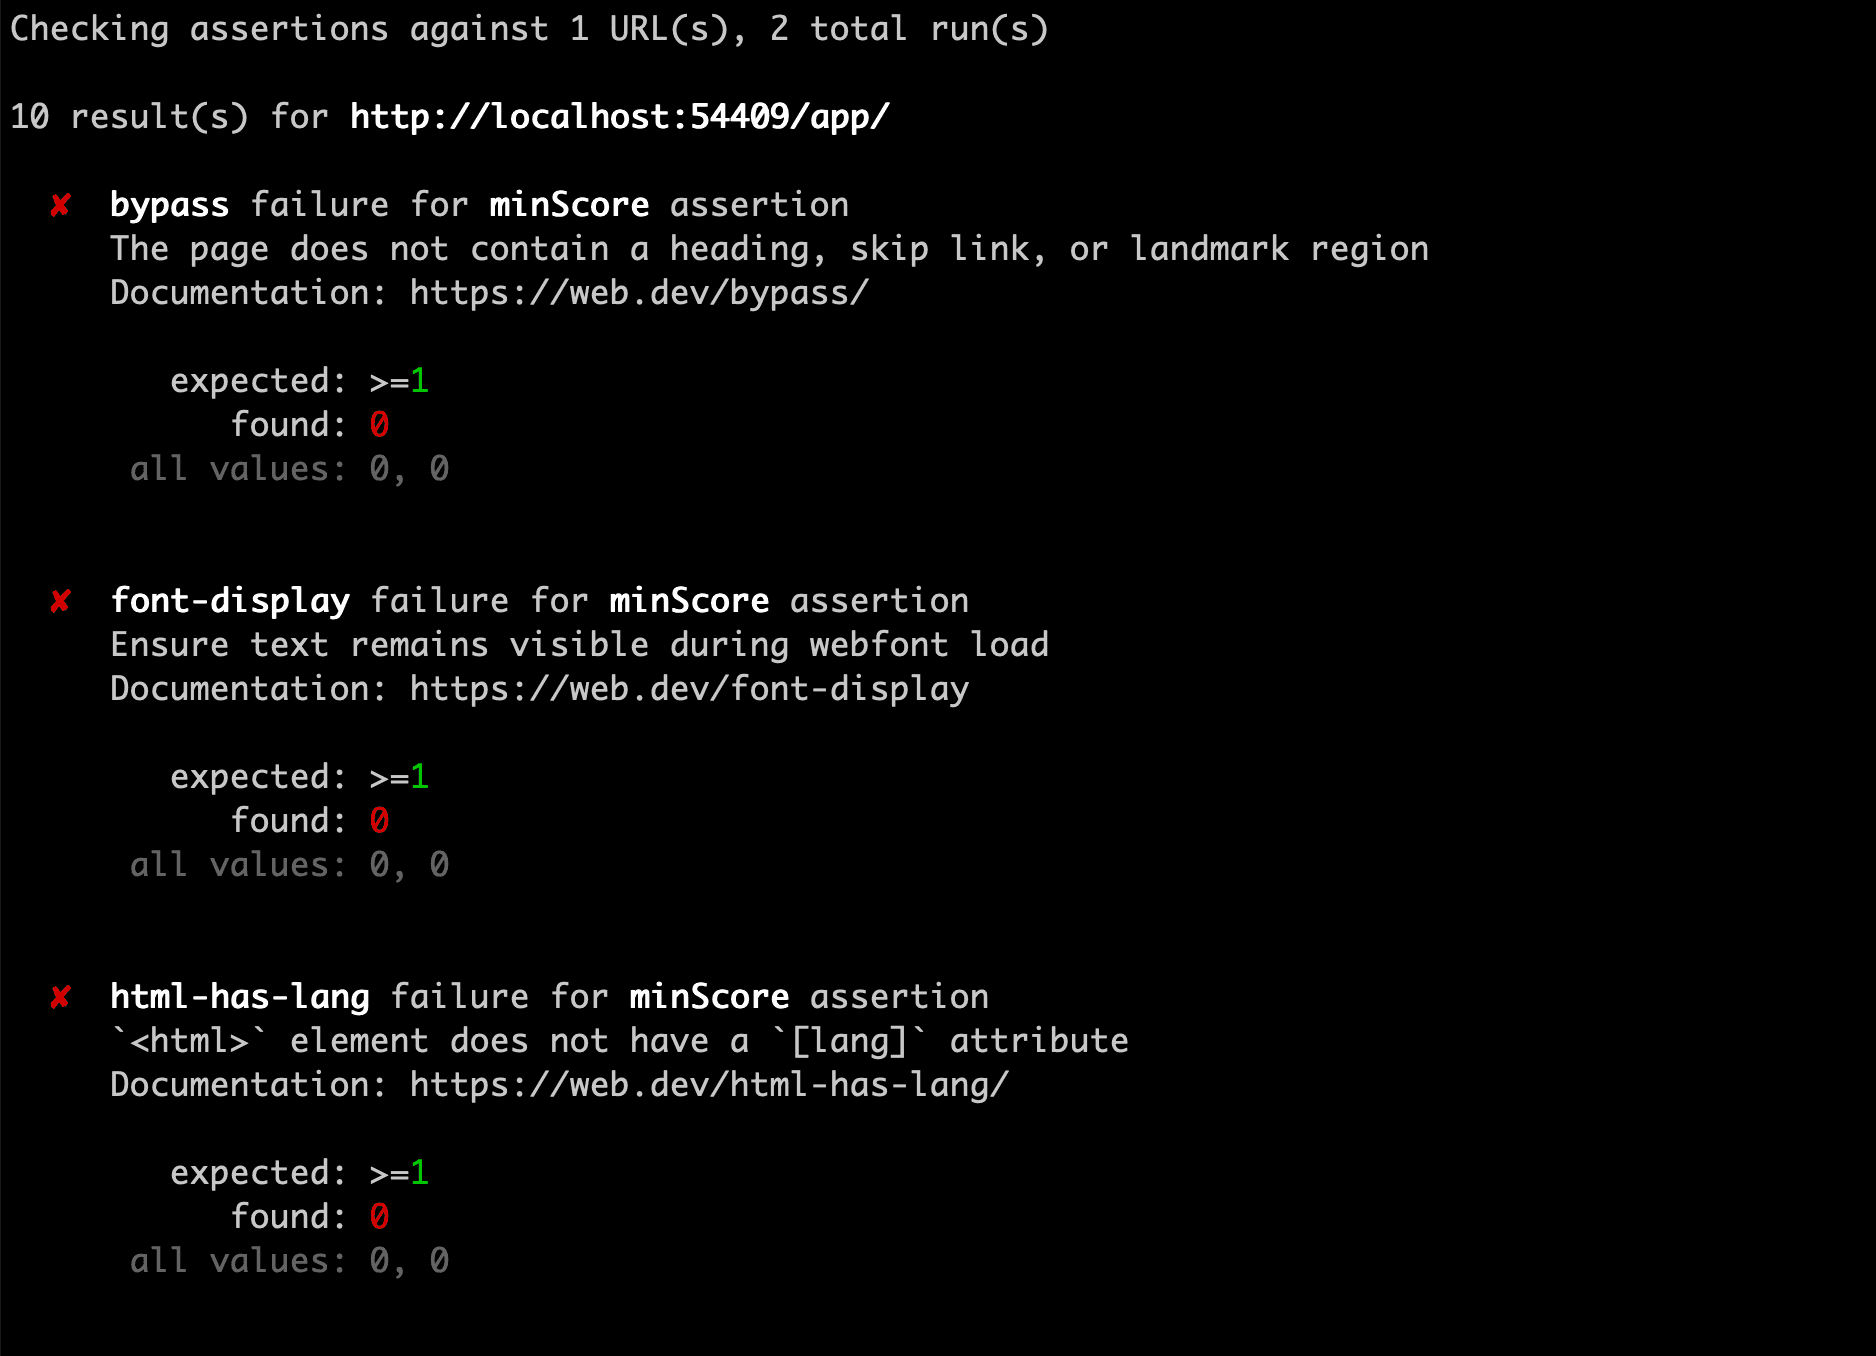
Google Lighthouse
Lighthouse is from Google, and you can access it now (if you are using Chrome) in the dev tools. It can report back on accessibility issues.
Google's Lighthouse CI is a set of tools that make it easy to run Lighthouse checks in your CI/CD flows.
It is very simple to set up - if you use Github Actions, add this as a workflow YML file:
name: CI
on: [push]
jobs:
  lighthouseci:
    runs-on: ubuntu-latest
    steps:
      - uses: actions/checkout@v3
      - uses: actions/setup-node@v3
        with:
          node-version: 16
      - run: npm install && npm install -g @lhci/[email protected]
      - run: npm run build
      - run: lhci autorun
And the screenshot below shows typical output for accessibility violations:
BBC a11y checker
The BBC website is well known for having great accessibility. So it isn't a surprise that they have a tool to help automatically check for some a11y issues.
bbc-a11y can work in Docker (and run in your CI checks). It will run tests against their a11y rule guidelines
Use paid services
There are some paid SaaS tools and services that can run as part of your CI/CD. They might not integrate as smoothly into Github Actions/CircleCI/etc but you can hack something together to run tests on every build. They can also be useful to run regular checks on production - especially for apps that are more like websites with a lot of content (such as blogs).
A11yWatch
I've not used them, but a11ywatch.com is one example. You can pass a url and config to it, and it can run as part of your CI (the linked example is for Github Actions).
WebAIM
Their API is easy to use, and can report back on accessibility issues on urls. Check out wave.webaim.org.
It can cost from $0.04 - $0.025 per credit (one credit = basic analysis of one url).
Axe Monitor
Dequeue have a paid service to run automated tests on urls - check it out on deque.com/axe/monitor.
Important last thing to mention
- Automated testing like this gets the low-hanging fruit. The super easy things to pick out automatically. You could have an app that passes every automated accessible test in the world, but real users might have significant issues with it.
- They also only catch common problems.
- They don't catch everything - they only catch common problems. There is no automated accessibility testing tool that will catch all WCAG violations.
- They also can often report violations which are not violations. If you don't understand the violation, 'fixing' the reporting errors can reduce accessibility.
Have suggestions?
Please get in touch and let me know if you know of a tool that you'd recommend.